collection of …..
so…here is a bunch of linux “things” that I have collected over the years I’m not quite sure how usefull is this here but…who knows. ;)
- in case you have the problem with pyhthon after installing gns3
sudo ln -s /usr/bin/python3 /usr/bin/python
DNS settings - check public IP with CLI
curl ifconfig.io
GUI on RHEL server
ssh key creation
ssh-keygen \
    -m PEM \
    -t ed25519 \
    -b 4096 \
    -C suse-admin@open-systems.com

PermitRootLogin yes
systemctl restart sshd
PermitRootLogin without-password

ssh-keygen -o -a 200 -t ed25519 -f ~/.ssh/file-name -C "some@email.address"
- in more detail:
# RSA – This algorithm uses the difficulty of factoring large numbers. A minimum of 2048 bits is recommended, but 4096 is considered significantly better.
ssh-keygen -t rsa -b 4096
# Here's a one liner for RSA based on recommended values: (without passphrase)
ssh-keygen -t rsa -b 4096 -o -a 100 -f ~/.ssh/id_rsa -q -N ''
# For adding to ssh agent automatically, you can use (RSA, no passphase)
keyname='secretKey' ; comment='someone@email.com' ; ssh-keygen -t rsa -b 4096 -o -a 100 -f ~/.ssh/$keyname -q -N '' -C $comment ; eval `ssh-agent` ; ssh-add ~/.ssh/$keyname

# ECDSA – Stands for Elliptic Curve Digital Signature Algorithm, which uses elliptic-curve cryptography
ssh-keygen -t ecdsa -b 521

# ed25519 – Fairly new algorithm which is intended to provide attack resistance comparable to quality 128-bit
ssh-keygen -t ed25519 -a 100
# Here's a one liner for Ed25519 based on recommended values: (without passphrase)
ssh-keygen -t ed25519 -a 100 -f ~/.ssh/id_ed25519 -q -N ''
netplan
network:
	ethernets:
		ens160:
			dhcp4: false
			dhcp6: false
			addresses:
				- X.X.X.X
			routes:
				- to: default
				- via: x.x.x.2
			nameservers:
			addresses:
				- x.x.x.x
	version: 2
	renderer: networkd
sudo netplan apply
# In case you run into some issues execute:
$ sudo netplan --debug apply
Youtube-dl & yt-dlp
- currently using yt-dlp since youtube-dl is broken
reference site here
# yt-dlp
brew install yt-dlp/taps/yt-dlp

sudo curl -L https://github.com/yt-dlp/yt-dlp/releases/latest/download/yt-dlp -o /usr/local/bin/yt-dlp
sudo chmod a+rx /usr/local/bin/yt-dlp

sudo wget https://github.com/yt-dlp/yt-dlp/releases/latest/download/yt-dlp -O /usr/local/bin/yt-dlp
sudo chmod a+rx /usr/local/bin/yt-dlp

# youtube-dl
sudo wget <https://yt-dl.org/downloads/latest/youtube-dl> -O /usr/local/bin/youtube-dl
sudo chmod a+x /usr/local/bin/youtube-dl

yt-dlp -f bestvideo+bestaudio <your-link-here>
yt-dlp -f bestvideo+bestaudio -o '%(playlist)s/%(playlist_index)s - %(title)s.%(ext)s' "your-playlist-link-here"
--playlist-start NUMBER     Playlist video to start at (default is 1)

--playlist-end NUMBER      Playlist video to end at (default is last)

--playlist-items ITEM_SPEC    Playlist video items to download. Specify
                 indices of the videos in the playlist
                 separated by commas like: "--playlist-items
                 1,2,5,8" if you want to download videos
                 indexed 1, 2, 5, 8 in the playlist. You can
                 specify range: "--playlist-items
                 1-3,7,10-13", it will download the videos
                 at index 1, 2, 3, 7, 10, 11, 12 and 13.
mp3 --playlist-items 1-7,9-12,14-79,81-87,89-91,93-98,100-110,112-120 "your-playlist-link-here"

- Download YouTube playlist videos in separate directory indexed by video order in a playlist

yt-dlp -o '%(playlist)s/%(playlist_index)s - %(title)s.%(ext)s' <your-playlist-link-here>

- Download all playlists of YouTube channel/user keeping each playlist in separate directory:

yt-dlp -o '%(uploader)s/%(playlist)s/%(playlist_index)s - %(title)s.%(ext)s' "your-playlist-link-here"

yt-dlp -f bestaudio -o '%(uploader)s/%(playlist)s/%(playlist_index)s - %(title)s.%(ext)s' "your-playlist-link-here"
channel scan
w_scan -c HR -X > channels.conf
# vlc channels.conf
Making a bootable installation disk
dd if=/path/to/<image_name> of=/dev/fd0 rawrite.exe
ffmpeg conversion
ffmpeg -i input.wav -vn -ar 48000 -ac 2 -ab 320k -f mp3 output.mp3
for i in *.webm; do ffmpeg -i "$i" -vn -ar 48000 -ac 2 -ab 320k -f mp3 "${i%.*}.mp3"; done
ffmpeg -i *.mkv -vn -ar 48000 -ac 2 -ab 320k -f mp3 xxx.mp3
rdesktop
rdesktop -u lc-adm -d localhost -g 1440x840 192.168.194.79
add missing key
sudo apt-key adv --keyserver keyserver.ubuntu.com --recv-keys AA8E81B4331F7F50
Reduce PDF size
gs -sDEVICE=pdfwrite -dCompatibilityLevel=1.4 -dPDFSETTINGS=/screen -dNOPAUSE -dQUIET -dBATCH -sOutputFile=output.pdf input.pdf

  -dPDFSETTINGS=/screen lower quality, smaller size. (72 dpi)
  -dPDFSETTINGS=/ebook for better quality, but slightly larger pdfs. (150 dpi)
  -dPDFSETTINGS=/prepress output similar to Acrobat Distiller "Prepress Optimized" setting (300 dpi)
  -dPDFSETTINGS=/printer selects output similar to the Acrobat Distiller "Print Optimized" setting (300 dpi)
  -dPDFSETTINGS=/default selects output intended to be useful across a wide variety of uses, possibly at the expense of a larger output file
Mounting vmware folders
sudo apt-get install open-vm-tools open-vm-tools-desktop
sudo apt-get install build-essential module-assistant linux-headers-virtual linux-image-virtual && dpkg-reconfigure open-vm-tools
vmware-hgfsclient
mkdir /mnt/hgfs/share
sudo vmhgfs-fuse .host:/share /mnt/hgfs/share -o allow_other -o uid=1000
sudo nano /etc/fstab
.host:/share  /mnt/hgfs/share  fuse.vmhgfs-fuse  defaults,allow_other,uid=1000   0  0
FIND
- How do you find all of the files owned by a user then copy those files to a temp folder?
find / -user user -exec cp {} /tmp \;

find /home/<user> -type f -exec grep -l <word> {} \; | xargs mv -t /home/<some-folder>/
- find all files with extension .gif
find /home/<user>/Downloads/ -type f -name "*.gif"
- Find all gif’s and copy them
find ~/Downloads/ -type f -name "*.gif" -exec cp {} GIFS/ \;
- find and move all .pdf files to somewhere
find / -type f -name "*.pdf" -exec mv {} /home/<move-dir>/ 2>cp.err \;
- If you also want to see differences for files that may not exist in either directory:
diff --brief --recursive --new-file dir1/ dir2/ # GNU long options
diff -qrN /media/baggins/Mel - externi /media/baggins/My Book/MEL/externi-disk-backup # common short options
grep
- find email addresses in a file
grep -oe "[a-zA-Z0-9._]\+@[a-zA-Z]\+.[a-zA-Z]\+" test.txt | uniq
grep -Rnw '/path/to/somewhere/' -e 'pattern'
grep -Rnw . -e ‘cvp.admin’
- replacing text in files
sed -i 's/string_1/string_2/g' *.txt
find . -name "*.txt" |xargs sed -i "s/searched_Text/replacement_Text/g"

# Here I use sed to replace every occurrence of the word "cybernetnews" with "cybernet" in every file with the extension, c, in the directory, /home/user/directory/.
find /home/user/directory -name \*.c -exec sed -i "s/cybernetnews/cybernet/g" {} \;

# A more generic variation where you search recursively from the directory of execution and operate on only regular, readable, writeable files:
find ./ -type f -readable -writable -exec sed -i "s/cybernetnews/cybernet/g" {} \;
VIM
- Invoke external binaries from within vim
:!r ip route show | grep default | cut -f 3 -d " "
- Insert existing file
:r /etc/passwd
- Search and substitute (replace)
:%s/old/new/g
:%s/old/new/gc --> to be prompted for a change
- h –> to move left
- j –> to move down
- k –> to move up
-
l –> to move right
- e
- When pressing the e key, we move to the end of the word, or the end of the next word, depending on where the cursor is.
- b
- When pressing the b key, we move to the start of the word, or the start of the previous word, depending on where the cursor is.
- $
- A dollar sign will move you all the way to the end of the line.
- 0
- A zero will move you back, to the start of the line.
- Number before a move command
- If you write a number before the move command, Vim will execute the command the number of times you’ve entered.
- If you type 10e, Vim will move 10 words ahead. If you type 3j, Vim will move down 3 lines.
- gg
- This command will move you to the start of the document.
- Shift+g
- This command will move you to the last line of the document.
- number + shift+G
- Do you know which line number you’re moving to? Say you need to do some work at line 56. just type out 56, and press shift+G. Easy!
- u
- I wanted to show you this command first. This is equivalent to ctrl+z on Linux and Windows, and cmd+z on mac. Why it’s important is pretty self explanatory.
- i
- To enter Insert Mode, and start writing, we press i.
- ctrl+r
- Redo. Goes hand in hand with undo, or u.
- daw
- Stands for ‘delete a word’, and will delete the entire word.
- ciw / caw
- Stands for ‘change word’. the command deletes the word, and put you directly in Insert Mode. The difference between these commands, is that ciw will leave a space, while caw will will jump to the first character of the next word.
- Try it yourself. Write out two words. Jump back to the first word, and try out both commands. Which one do you like best? If you ask me, ciw is the way to go. It might be one of the most useful commands in Vim.
- cw
- This command deletes a word from the cursor, which means everything before the cursor will be left alone.
CONSIDER THIS TEXT:
const newNumber;
CURSOR ON N:
const newNumber;
         ^
USE cw:
const new
- As we can see from the example, the text got deleted at the cursor, and Vim put us in Insert Mode. as you may see, this makes for very quick text edits.
- dd
- This command will delete an entire line of text.
- d$
- This command will delete from the cursor, and to the end of the line.
- d0
- This command will delete from the cursor, and to the beginning of the line.
- x
- x will delete the character underneath the cursor.
- di} di) di] di” di’
- And so on, and so forth. These commands are very, very useful if you’re editing code. Think of it like this: ‘delete inside bracket’, ‘delete inside quotes’.
CONSIDER THIS MOCK VARIABLE
const variable = {...something, id: newId};
MOVE CURSOR SOMEWHERE INSIDE THE BRACKETS
const variable = {...something, id: newIid};
                    ^
TYPE ci}
const variable = {};
The example above works with all types of brackets, single and double quotes. It is an amazing way to delete inside, and makes for very efficient text editing.
- yy
- y stands for yank. This command will duplicate a whole line.
- p
- paste (put). If you use it after yy, you paste the line you just duplicated. This command also works with deletion of words. So if you need to delete a word and paste it in another place, you delete it, move the cursor to where you want to paste it in, and press p.
- yw / yiw
- Works the same as deleting words, except these commands will copy them. You may use p to paste them again.
- o
- o will enter Insert Mode on a new line, underneath the cursor.
- O
- O will enter Insert Mode on a new line, above the cursor.
- r
- replaces the character underneath the cursor.
- .
- This command will repeat the last change you’ve made.
- v
- v will enter Visual Mode from where the cursor is, and let you highlight text relative to the cursors position when you entered Visual Mode.
- Shift + v
- This will highlight line by line. This is a command I’m using all the time.
- It makes it very easy to select chunks of text.
- /word-to-find
- Search for text
- :s/old-word/new-word
- This command will replace the old word, with the new word, on the line which the cursor is currently on.
- :%s/old-word/new-word/g
- Note the percent character. This command will replace every old word with the new word, throughout the entire document.
raspberi
- /etc/resolv.conf
# A sample configuration for dhcpcd.
# See dhcpcd.conf(5) for details.

# Allow users of this group to interact with dhcpcd via the control socket.
#controlgroup wheel

# Inform the DHCP server of our hostname for DDNS.
hostname

# Use the hardware address of the interface for the Client ID.
clientid
# or
# Use the same DUID + IAID as set in DHCPv6 for DHCPv4 ClientID as per RFC4361.
# Some non-RFC compliant DHCP servers do not reply with this set.
# In this case, comment out duid and enable clientid above.
#duid

# Persist interface configuration when dhcpcd exits.
persistent

# Rapid commit support.
# Safe to enable by default because it requires the equivalent option set
# on the server to actually work.
option rapid_commit

# A list of options to request from the DHCP server.
option domain_name_servers, domain_name, domain_search, host_name
option classless_static_routes
# Respect the network MTU. This is applied to DHCP routes.
option interface_mtu

# Most distributions have NTP support.
#option ntp_servers

# A ServerID is required by RFC2131.
require dhcp_server_identifier

# Generate SLAAC address using the Hardware Address of the interface
#slaac hwaddr
# OR generate Stable Private IPv6 Addresses based from the DUID
slaac private

# Example static IP configuration:
interface eth0
static ip_address=192.168.1.254/24
#static ip6_address=fd51:42f8:caae:d92e::ff/64
static routers=192.168.1.1
static domain_name_servers=1.1.1.1 9.9.9.9

# It is possible to fall back to a static IP if DHCP fails:
# define static profile
#profile static_eth0
#static ip_address=192.168.1.23/24
#static routers=192.168.1.1
#static domain_name_servers=192.168.1.1

# fallback to static profile on eth0
#interface eth0
#fallback static_eth0
Scan from PI
sudo scanimage --format=jpeg --resolution=300 -p > output.jpg
record session
# Simplest Way to Log Shell Sessions
script simplescript.log

# A single command
script -c 'netstat -tupln' netstat.log

# Add timing information, so you can replay the shell session later
script myscript.log --timing=time.log

# Replay a captured shell session (with timing info)
scriptreplay -s myscript.log --timing=time.log
scriptreplay -s myscript.log -t time.log
strace
strace -ff -e trace=network -o output.txt [program]

# follow forks to capture spawned threads and child processes and limit capture to network syscalls
rsync
rsync -avzhp --exclude sshalert/venv sshalert user@remote.server
openssl
# get the cert chain
openssl s_client -connect monitoring.open.ch:443 -showcerts < /dev/null 2>/dev/null


awk -v cmd='openssl x509 -noout -subject' '
    /BEGIN/{close(cmd)};{print | cmd}' < /etc/ssl/certs/ca-certificates.crt
file operations
# to create multiple files in those folders
touch dir_{a..z}/{a..z}/file{0..5}.{log,dat}
touch dir_{a..z}/file{0..5}.{log,dat}
regex
- Find IP address and
(\d+)[.](\d+)[.](\d+)[.](\d+.*) # \d+ finds the any number before [.] which finds the "dot" specificaly # .* selects the text inside () # () allow us to access whatever is inside the parentheses. The first set of parentheses may be accessed with \1 and the second set with \2. # \1\r\n\2 will take whatever text comes after it, will then add a new line, and place the string "Item" on the new line. - find string and delete after:
# (find 255.255. mask and delete the rest) 255.255..* - find string and delete before:
# (find word test) .*test - find line containing a string and delete the whole line
# (find word “edit” and delete the line) .* edit.*\r?\n - exclude all commented lines in the file
grep -Ev ^'(#|$)' - find FROM–>TO
(?s)(?<=FROM).*?(?=\TO)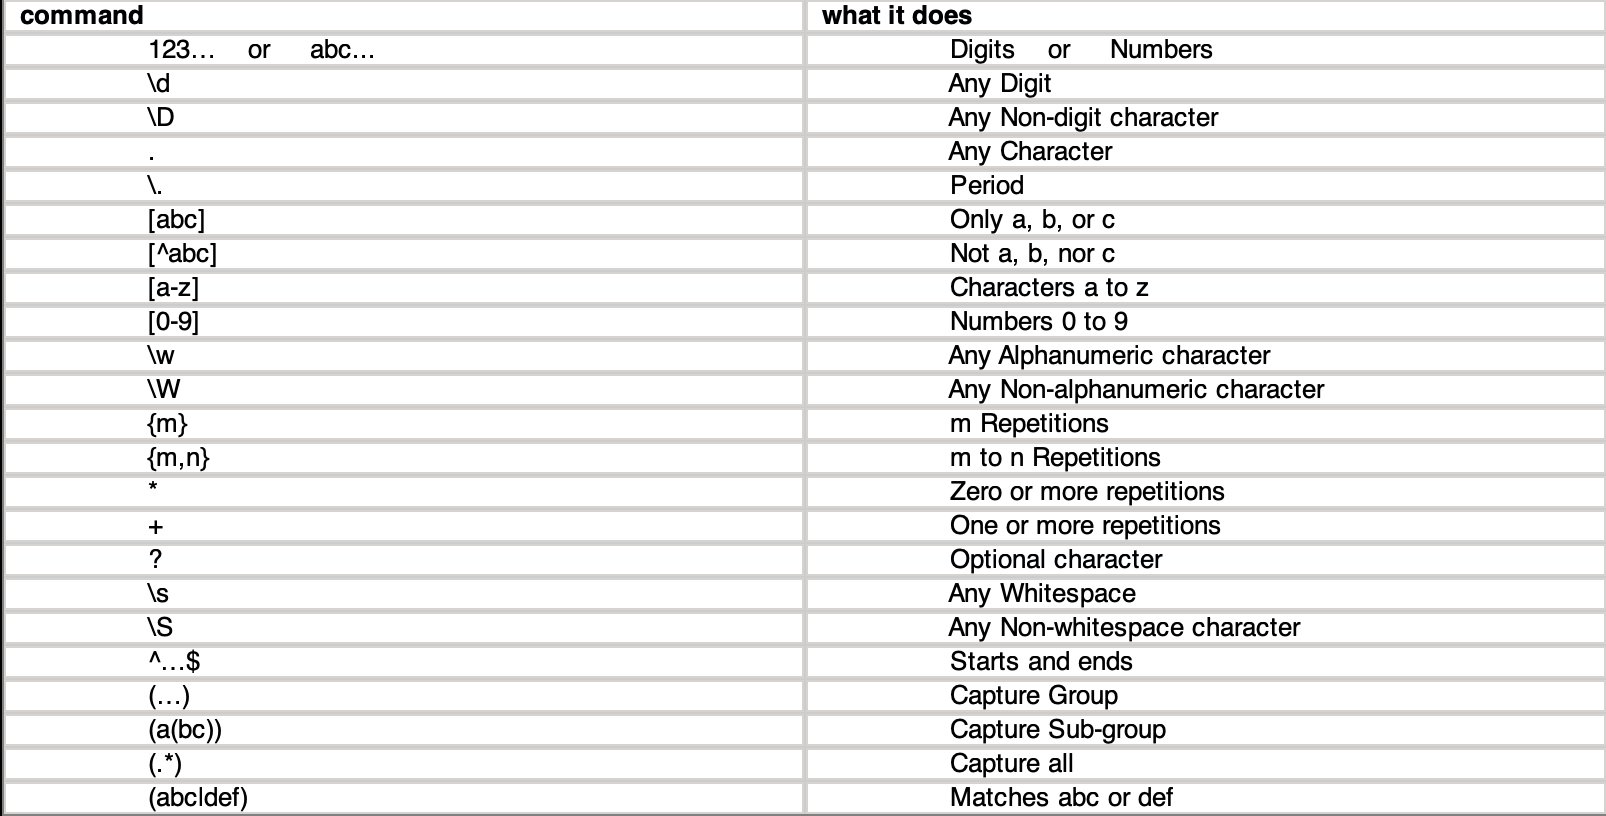
PREVIOUSpython switch config